Citroen Xsara Picasso and other similar cars (Berlingo
etc) steering rack bellows (boot, gaiter) replacement.
ADVICE
IS PROVIDED WITHOUT LEGAL LIABILITY - this is just how I did the job.
These photographs show a
method of replacing the steering rack gaiter which is on the leftside (RHD cars)
or the right side (LHD cars).
Apart from general garage
tools, a long T55 Torx bit will be required, and also a special tool to remove
the inner tie rod. An 18mm aviation ring spanner with a slight offset may be
needed to remove the nut on the ram spigot bolt. Access is restricted and a normal
offset ring spanner may have too much offset.
Apart from that you will just
need time and patience! You do not need to drop the subframe, or drain the
hydraulic oil.
The most difficult part of the
job is getting the new gaiter onto the rack. This is not shown in the photos but
is explained as follows - study all the photographs first!!
Work in a warm garage with a heater if possible
to warm the steering rack yoke and the new gaiter (bellows). Wear thin
protective gloves.
Oil the surfaces of the rack over which the
gaiter should slip. Oil the inside of the gaiter.
COMPRESS the gaiter by hand to its smallest
length and slip this whole length over the peg bolt. This is the
essential first step.
Now for the difficult bit. You have to persuade the gaiter to 'turn
the corner' around the body of the housing (yoke). Slide it, little by little,
always pressing inwards towards the centre of the car, so it doesn't spring back. Yes it will work, you need patience, keep pushing it, make sure the
extreme end of the gaiter does not 'turn inside' the bellows section or you
will be trying to force a double thickness of plastic/rubber over the metal
yoke!
You will need CAREFUL use of a 150mm long smooth
tyre lever or a similar implement - a tool with no sharp edges on it.
Keep pressing inwards as you gently ease the
gaiter over the yoke, bit by bit. This can take a few frustrating minutes. Keep
trying to push the gaiter inwards, don't let it 'spring back out', or you will
need to start again.
Once installed, check for splits and remove all
traces of oil from the 40mm diameter surfaces that will contact the steel/alloy
at either end of the gaiter. If these are left oiled, they may slip off the rack
or yoke as the steering is turned. There is almost no lip at the yoke end. One everything is in place, secure with metal
or plastic gaiter clips.
I used a Borg and Beck gaiter set - code BSG 3262
(about £20 via an eBay seller). Other expenses were the tie rod tool -
about £10, again via eBay and a US PRO 18/19mm offset aviation ring spanner
(again about £10).
|

|
On one side of the car, the rack
gaiter is easy to remove and replace.
On the other side, it is difficult.
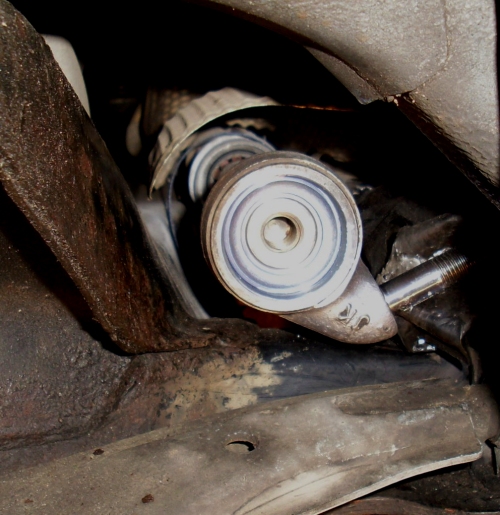
This shows the 'difficult' split gaiter -
which will fail an MOT in the UK.
Above the gaiter is the hydraulic ram,
protected by a plastic cover. Citroen do not supply spare plastic covers -
so don't damage it! |
 |
The first stage is to loosen the
wheels and jack the
car up quite high using trolley jacks under the front sub-frame both sides
of the car - and make sure it is VERY WELL secured both sides. Remove the
wheels.
You will be killed if the car drops on top of
you.
The method shown here utilises old steel
wheels of 15" and 13" size - these fit snugly inside each other and form a
very stable base for large blocks of wood placed under the front jacking
points.
In my opinion, this method is safer than using tall
axle stands - because these can topple sideways all too easily.
Remember - you will be killed if the car falls on top of
you. |
|

|
Turn the steering so that the
gaiter shown is fully compressed (and the failed gaiter is fully extended).
To remove the hydraulic ram piston from the peg
on the end of the rack, you need first to remove the long finely threaded
T55 bolt on the other end of the ram - shown in this photo.
DO NOT loosen the two much smaller Torx
screws that hold the metal plate in place. There are washers, seals and
shims under this plate DO NOT DISTURB THEM !!
Once the T55 bolt has been removed, remove
the 12mm washer that is between the plate and the ram body. This will
give some extra lateral freedom of movement between the ram body and the plate. |
|

|
Once the T55 bolt and its washer
have been removed you can carefully lever the end of the ram off the spigot
bolt near the failed gaiter. You must have the ram at full extension to
do this - with the steering turned so that the components shown are as
close to the edge of the car as possible. This will reduce the amount by
which the the two small hydraulic pipes are bent.
The pipes are like brake pipes - they will
tolerate a small amount of bending.
With the end of the ram levered off the
spigot bolt, REPLACE the large T55 bolt - just loosely. Then push the
end of the ram and the plastic cover away from the working area.
Obviously you need to remove the outer tie rod
joint. |
|

|
It is a good idea to support the
ram along its length - here, a wedge of foam pipe insulation has been
inserted between the ram and one of the larger hydraulic pipes.
This helps to guard against damage to the small
hydraulic pipes.
The heat shield is still attached to the ram -
there is no need to remove it - at least not on my petrol Xsara Picasso. On
other models using a similar rack there may be even less room to work.
|
|

|
Once the old boot has been cut
away (and do this very carefully to avoid damage to nearby components), you
can see the exposed surface of the steering rack. This will have lines on it
(shown green), these are merely from the serrated guide bush. The spaces
allow air to travel from one end of the rack to the other, preventing the
gaiters from bursting as the steering is turned!
There will be some white corrosion of the
alloy casing of the steering rack (circled red) - and this must be removed
so that the new gaiter can be secured onto a clean alloy surface. There is
more of a lip on the alloy than there is on the steel yoke at the other end
of the gaiter - hence the need to remove all oil before final assembly, as
mentioned in the notes at the top of the page.
|
|

|
Once the old gaiter has been
removed, the hydraulic ram end removed from the fixed bolt (peg), and pushed
out of the way, the main part of the job can commence.
It is tempting to try and remove the spigot bolt (peg),
but this is probably not a good idea. In any case IT WOULD NOT HELP in
getting the new gaiter onto the rack. I don't know if the bolt is removable
- it is probably very tightly secured into the yoke. If it shears off,
you'll need a new steering rack - and the old one will not be accepted as an
exchange unit. Therefore - leave this spigot bolt alone!
The troublesome P bush of these suspension
systems is shown - these fail regularly, but quality replacements cost only
about £10 each from GSF and are relatively easy to fit. eBay sellers will
offer dubious makes for twice the price! MOT testers should allow quite a
bit of cracking of these rubber bushes.
|
|

|
The small dust cover must be
peeled back from the inner tie rod joint. As original fitment, these have an
integral steel grab ring fused to the end of the rubber, and this
should if possible be prised off (without detaching it from the rubber as
the cover is removed), so it can be reused.
Replacement covers are lower quality, they just
have a rubber 'press fit' seal onto the smooth surface of the ball joint
outer surface.
Here, the rubber was prised away from the
grab ring, so (sadly) preventing any reuse of the original cover. |
|

|
The white corrosion products
must be removed from all around the end of the body of the steering rack.
This is easily done by using a long length of emery cloth cut to the
width of the groove. The cloth is
simply wrapped around and then pulled back and forth until no more white
dust falls away from the area of the surface that cannot be seen. This part
of the job takes about a minute! |
|
|
The yoke end of the steering
rack once the inner tie rod joint has been removed.
The splined bush of the steering rack can just
be seen under the heat shield (which itself does not need to be removed,
just moved a little out of the way). |
|

|
A dab of paint on the inner
surface of the tie rod will help confirm it has been tightened to the
correct position, but in practice, one the joint has been tightened up, no
further movement is possible - it simply locks solid - and Loctite should be
used to help ensure that it never comes loose.
I used Loctite grade 262 (general purpose,
medium strength). You must degrease the thread surfaces before using this
product.
Loose steering tie rods are extremely dangerous!! |
|

|
This tie rod removal tool was sold as a Nielson
brand, via an eBay seller, but was a Chinese make.
It suits 33 to 42mm joints. Those on the Xsara
Picasso are about 38mm diameter.
It worked very well, both for dismantling and
reassembling. Just press it firmly towards the middle of the car before
turning. Use a long extension and a breaker bar.
I believe the torque is about 45 ft-lb -
don't overdo it or apparently you can bend and crack the alloy body of the
rack.
This tool uses a 1/2" square drive. |
|

|
The best design of ball joint
remover - the splines on the rotating off-centre grab wheel extend almost to
the edge of the tool, making it suitable for use with inner tie rods that
have only a small length of straight surface on which the tool can grip.
If necessary the small bolt can be removed to
allow the tool to press more squarely onto the joint that is to be gripped.
The small bolt just holds the tool together! |
|

|
The distance between the two
yellow lines should be as small as possible. On some tool designs, this
distance is too large to work with joints that have only a short
distance of parallel surface on which the tool can grip. The same tool is of
course used to remove and retighten the rack ball joints. |
Home page
Some car repairs
on a Saab 900 Classic - many years ago!
Other Saab Classic
900 repairs